
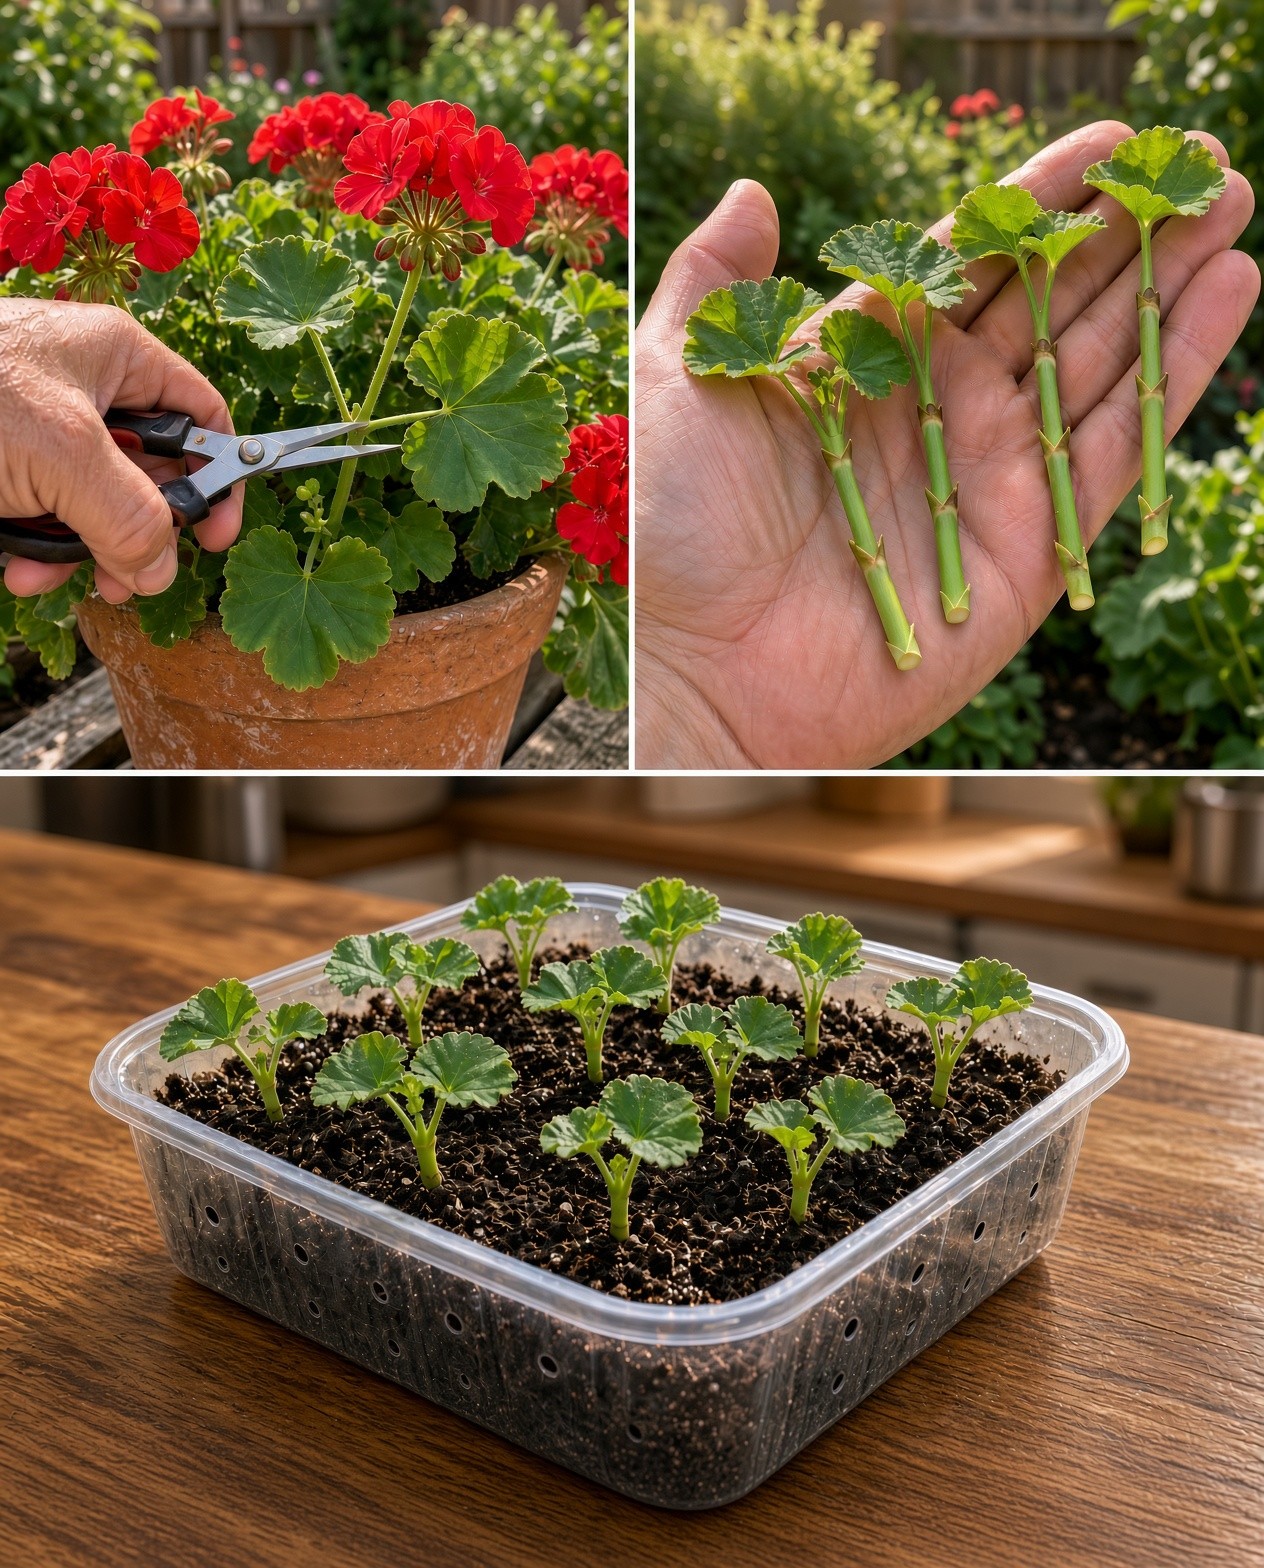
A step-by-step guide to multiplying favorite pelargoniums and keeping young plants healthy through winter.
You do not have to throw away your favorite geraniums when summer ends. The colorful plants commonly grown in window boxes and patio pots are usually Pelargonium, tender plants that can be damaged or killed by frost. Taking stem cuttings before cold weather is a simple, inexpensive way to keep a favorite variety for next year and grow several plants from one healthy parent. Select healthy shoots, remove lower leaves, plant in a free-draining medium, and give cuttings bright light without keeping them soggy. This guide explains each step and how to care for young plants through winter.
At a Glance
- Take 3–4 inch (8–10 cm) cuttings before frost.
- Remove lower leaves and flower buds.
- Use a light rooting mix in pots with drainage.
- Provide bright indirect light and avoid soggy soil.
- Pot up after rooting and harden off before spring planting.
1. Take Cuttings Before Frost
The best time to save tender bedding geraniums—usually Pelargonium—is before frost damages the stems. Check the forecast and take cuttings while the parent plant is healthy and actively growing. Avoid shoots with pests, leaf spots, blackened stems, or soft, rotting areas. Choose a dry part of the day and take several strong tips from different sides, leaving enough foliage for the original plant to recover. If you want to keep the parent too, bring it indoors before frost after checking carefully for insects.

2. Choose Strong, Healthy Shoots
Look for firm green stems with several visible leaf joints, called nodes. Avoid weak, stretched growth, damaged leaves, or shoots carrying flowers and buds. Removing blooms lets the cutting focus on roots. Use clean, sharp scissors or pruning snips to avoid crushing the stem. If preparing cuttings from several plants, clean tools between plants, especially if disease is suspected. A few excellent cuttings are more useful than a tray full of questionable material.

3. Cut Each Stem to the Right Length
Take tip cuttings around 3–4 inches (8–10 cm) long, ideally with two or three nodes. Make the lower cut just below a node, where roots often emerge. Remove flower stalks and buds. Strip leaves from the lower half, leaving a small cluster at the top. Buried leaves can rot, while excess foliage loses water before roots develop. If top leaves are very large, trim them slightly, but do not remove every leaf. Rooting hormone is optional; many healthy geranium cuttings root without it.

4. Let Cut Ends Dry Briefly
Geranium stems are somewhat succulent, so freshly cut ends can rot in a wet, airless mix. After preparing cuttings, leave them in a clean, shaded, airy place for a short period so the cut surface can dry slightly. A few hours is often enough; avoid heat or letting leaves wilt. Some gardeners plant immediately and succeed, so treat this as a precaution rather than a strict rule. The priorities are clean tools, a free-draining medium, and careful watering. Never leave cuttings in standing water.

5. Use a Light Rooting Mix
Choose small pots or a tray with drainage holes. Fill with a light rooting medium such as perlite, vermiculite, or seed-starting mix amended with perlite. Heavy garden soil compacts and stays wet, increasing the risk of rot. Moisten the medium until evenly damp, not saturated. Make a hole with a pencil, insert the bare lower stem, and firm the mix gently so the cutting stands upright. Leave space for airflow and keep leaves above the surface. Label varieties if you are saving different colors.

6. Provide Bright Light and Gentle Warmth
Place pots in a bright spot with indirect light. Strong midday sun can overheat the container and wilt leaves before roots form, while a dark corner encourages weak growth. A comfortably warm room around 18–22°C is a useful target. Keep cuttings away from cold drafts and hot radiators. Geranium cuttings often do well with airflow and do not need a tightly sealed plastic bag. If you use a loose humidity cover, ventilate it and remove it if mold or rot appears. Inspect stems every few days.

7. Water Carefully and Wait for Roots
Keep the rooting medium lightly moist but never waterlogged. Check with a fingertip and water sparingly when the surface begins to dry; empty any saucer holding standing water. Too much water deprives stem bases of oxygen, while too little can cause shriveling. Rooting often takes four to eight weeks, though temperature, variety, light, and season affect timing. New leaves are encouraging but do not always prove roots have formed. After several weeks, give a very gentle tug; resistance suggests roots are anchoring the cutting. Avoid repeated pulling.

8. Pot Up Rooted Cuttings for Winter
When a cutting has a healthy root system and begins growing, move it into its own small pot with quality, well-draining potting soil. Handle the root ball gently. Water after potting, then let excess drain. Keep young plants in the brightest suitable window and rotate pots occasionally. Growth may slow during short winter days. Water when the upper layer begins to dry rather than keeping soil constantly wet, and avoid heavy feeding while growth is slow. If stems become long and thin, increase light and pinch tips only after the plant is established.

9. Return Plants Outdoors in Spring
Wait until frost danger has passed before moving young geraniums to outdoor containers or beds. Indoor plants need time to adjust to stronger sunlight, wind, and cooler nights. Harden them off over one to two weeks, starting in a sheltered spot for short periods and gradually increasing outdoor time and sun exposure. Do not move a plant straight from a dim room into hot full sun. Use containers with drainage and suitable potting mix. Water consistently, remove spent flowers, and pinch leggy shoots to encourage bushiness.

10. Avoid the Most Common Propagation Mistakes
Most failed geranium cuttings suffer from excess moisture, poor drainage, or unhealthy starting material. Do not use a pot without drainage holes, leave lower leaves buried, or keep the mix constantly wet. Check the base of each stem for darkening or softness; remove a rotting cutting promptly so it does not affect healthy neighbors. Equally, do not let every leaf shrivel from dryness while the cutting is trying to root. A small number of well-spaced cuttings in a clean pot is easier to monitor than a crowded container. Be patient: tugging every day can break developing roots, and a cutting may need several weeks before it is ready to pot up.
Keep labels with the pots if you are saving named cultivars or several flower colors. This small step helps you remember which plants you liked best when spring planting time arrives.
11. Keep the Original Plant as a Backup
If you have enough indoor space, consider saving the parent geranium as well as taking cuttings. Inspect it closely for insects, remove dead leaves, and trim away damaged growth. Pot a garden-grown plant into a container with drainage and fresh potting mix before frost. Place it in a bright window and water when the upper layer of soil begins to dry. Indoor plants may grow more slowly in winter and can drop a few older leaves as conditions change. Avoid overwatering and do not crowd the plant among other houseplants until you are confident it is pest-free. Keeping both the parent and several cuttings spreads the risk: if one plant struggles, you may still have healthy young plants ready for spring.