
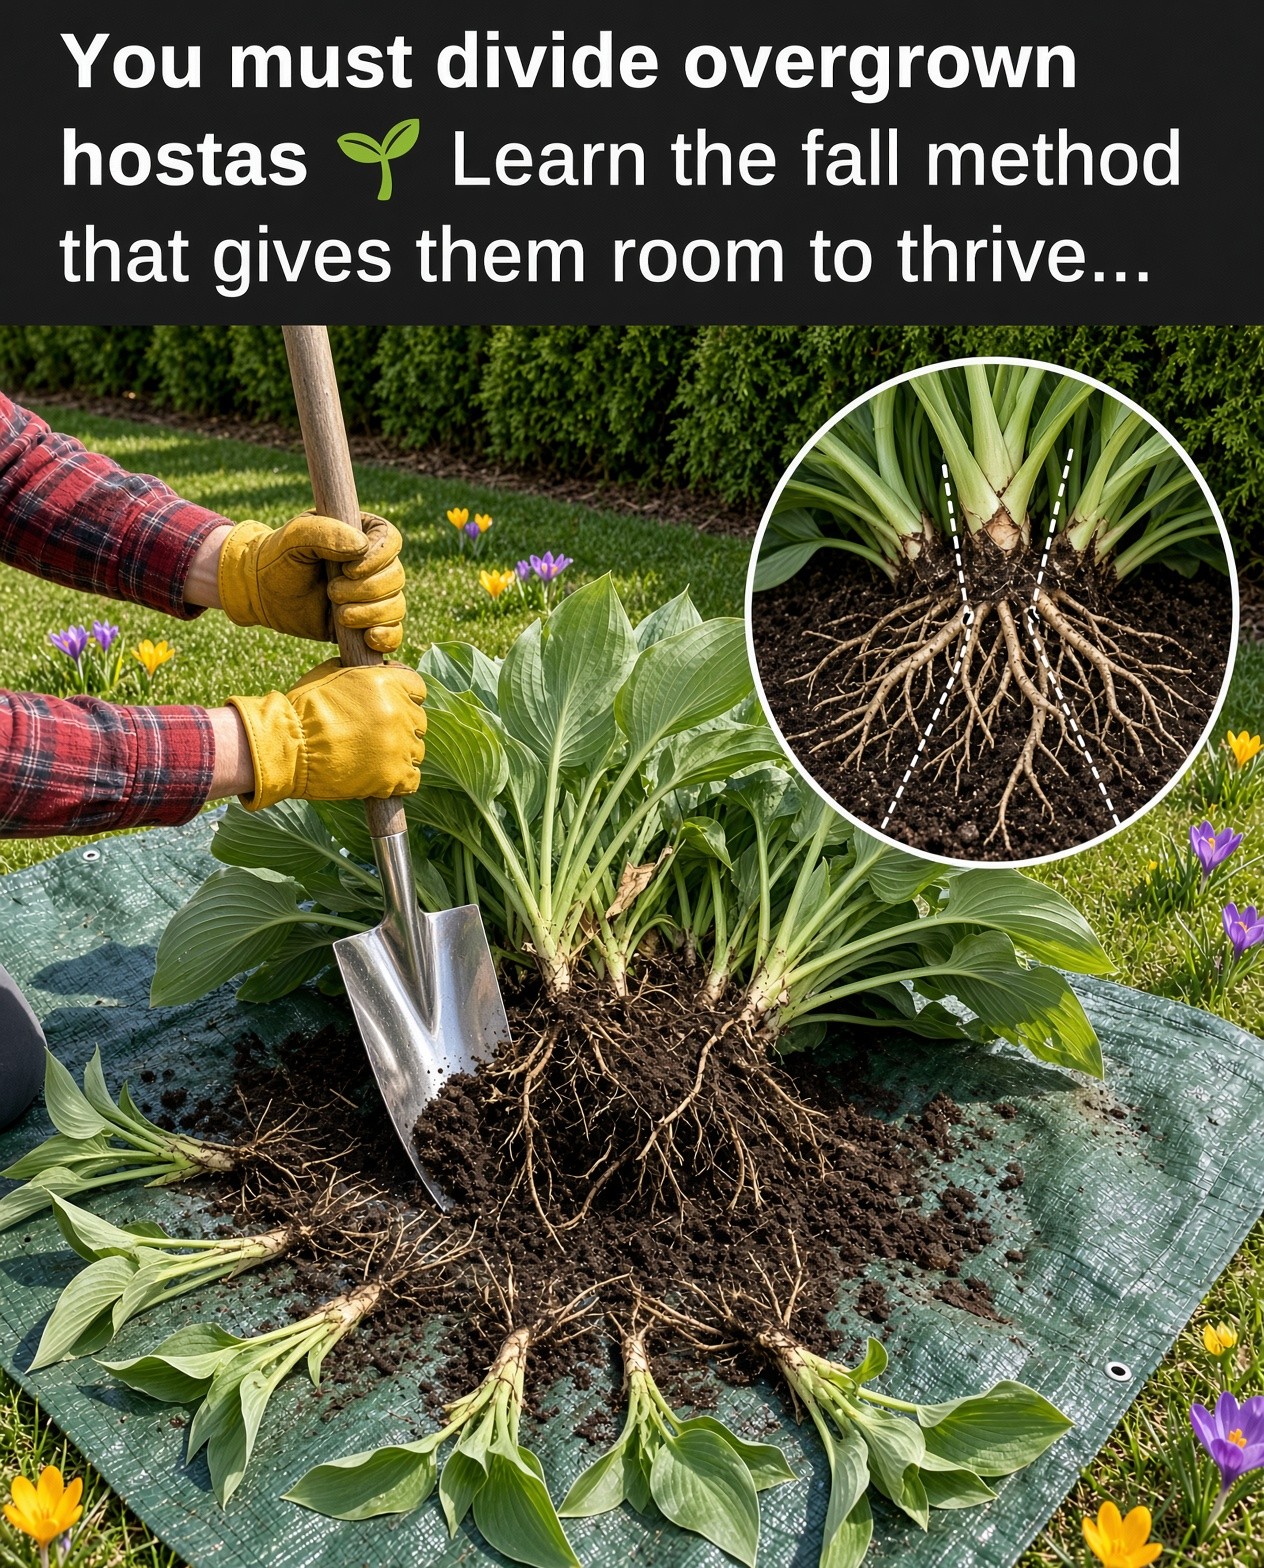

Why Divide Hostas in Fall?
Hostas are long-lived perennials, and a mature clump can remain attractive for years without being divided. Division is most useful when a plant has become crowded, the center of the clump is thinning, leaves are getting smaller, or you simply want to create additional plants. University of Minnesota Extension notes that hostas can be divided, although it generally recommends spring division before the plants become too large. Fall division can also work when the ground remains workable and there is enough time for new divisions to establish before hard freezing. citeturn0search5turn0search6
Hostas are among the easiest shade perennials to maintain, but even tough plants benefit from occasional rejuvenation. When a mature clump becomes overcrowded or starts losing its best shape, dividing it can create several healthy plants from one established crown. Fall can be a useful time for the job in regions with a sufficiently long cool season, although spring is the preferred timing in some Extension guidance. The key is to work when temperatures are moderate, soil is workable, and new divisions have time to establish before severe freezing. citeturn0search5turn0search6
1. Pick a Cool, Workable Day
Timing matters more than the calendar date. Choose a period in early fall when daytime temperatures are no longer extreme, the soil is workable, and the plants still have enough time to form roots before the ground freezes. In warmer regions, that window may extend later into autumn; in colder climates, finish earlier. Avoid dividing during heat, drought, waterlogged conditions, or immediately before a hard freeze.

2. Water the Hosta Before Digging
Give the hosta a thorough watering a day or two before you dig if the soil is dry. Moist soil is easier to penetrate and helps reduce the mechanical stress of lifting the root system. The goal is damp, workable soil rather than mud. If autumn rainfall has already kept the ground evenly moist, additional irrigation may not be necessary.

3. Gather the Right Tools
You do not need a complicated kit. A sturdy spade, garden fork, sharp clean knife, gloves, watering can or hose, and a tarp or piece of cardboard are usually enough. For a large, dense crown, a sharp spade or knife may be necessary because hostas can develop dense roots. Clean tools are especially important when working from one plant to another.

4. Dig Around the Entire Clump
Start several inches away from the foliage rather than plunging the spade directly into the crown. Work around the plant in a circle, loosening the soil as you go. Push the blade deeply enough to get underneath the main root mass, then lever the clump upward carefully. A large hosta may need a wider digging circle than a young plant.

5. Lift the Root Ball Carefully
Once the soil is loosened on all sides, lift the hosta by supporting the root ball rather than pulling hard on the leaves. Set it on a tarp or another clean surface where you can see the crown and roots. This is also a useful moment to inspect the plant for soft, discolored, or damaged tissue.

6. Find the Crown and Natural Divisions
Hostas grow from a crown with multiple growing points, often called eyes. Look for natural seams between groups of shoots. Smaller clumps may sometimes separate with your hands, but a mature plant can be quite dense. Each division should retain a healthy piece of crown and as much intact root material as practical.

7. Split the Clump With a Sharp Tool
If the crown will not pull apart easily, use a sharp, clean knife or spade to divide it. Make deliberate cuts instead of repeatedly hacking through the roots. University of Minnesota Extension specifically notes that dense hosta roots may require a sharp knife, garden fork, or similar tool. citeturn0search5

8. Make Divisions Large Enough to Recover
Avoid turning one large hosta into dozens of tiny pieces. A practical division has several growing points and a healthy portion of roots. Larger divisions generally have more stored energy and can settle into a new location more easily. If your main goal is rejuvenation rather than propagation, two or three substantial sections may be all you need.

9. Prepare the New Planting Holes
Choose a site with the amount of shade appropriate for your hosta variety. Dig holes broad enough to spread the roots without bending them sharply. The planting depth should match the original depth: the crown should sit at approximately the same soil level it occupied before division. Do not bury the crown under a thick layer of soil or mulch.

10. Replant Immediately When Possible
Place each division into its prepared hole, spread the roots outward, and backfill with the excavated soil. Press the soil gently around the root zone to remove large air pockets, but do not compact it heavily. Replanting promptly prevents the roots from drying out unnecessarily and makes the transition easier.

11. Water the New Divisions Thoroughly
Water immediately after planting so the soil settles around the roots. Continue checking moisture during the weeks that follow. Newly divided hostas should not be allowed to dry out while their roots are re-establishing, but the soil should not remain saturated. University of Minnesota Extension likewise recommends watering newly divided hostas until they are established. citeturn0search6

12. Add a Light Layer of Mulch
A modest layer of organic mulch can help moderate soil temperature, reduce moisture loss, and protect the root zone as autumn progresses. Keep mulch away from direct contact with the crown. Penn State Extension warns against piling mulch or soil around hosta bases because excessive moisture around the crown can contribute to disease problems. citeturn0search7

13. Give the Plants Time to Settle
Do not expect newly divided hostas to look spectacular immediately. Fall divisions are dealing with root disturbance while the plant is naturally slowing down. Some foliage may yellow or decline as the season advances. What matters is that the crown is planted correctly and the roots have suitable moisture and soil conditions before winter.

14. Do Not Divide Diseased Hostas
Division is not a good way to rescue a hosta with a suspected viral or serious crown disease. Penn State Extension notes that Hosta Virus X can spread easily on hands and tools and specifically advises against dividing infected plants. Bacterial soft rot and other serious diseases also require careful sanitation and removal of affected material. citeturn0search7

15. Check the Plant Again Before Winter
As the weather cools, make one final inspection. Confirm that the divisions have not heaved out of the soil, that the crown remains at the correct level, and that the root zone has not become excessively dry or waterlogged. Remove badly diseased debris, but avoid unnecessary disturbance once the plants are settling into dormancy.

When Is a Hosta Actually Ready to Divide?
Not every mature hosta needs division. If a plant is healthy, producing leaves of normal size, and filling its space attractively, you can leave it alone. Division becomes more useful when the clump has outgrown its location, the center has become less vigorous, leaves are noticeably smaller, or you want additional plants for another shaded bed. Division is also a practical way to correct a crowded planting scheme without buying more plants.
Look at the crown rather than relying only on age. Some hostas can remain productive for many years, while others become crowded sooner. A fixed three-year or five-year schedule is not necessary. Instead, let the condition and size of the clump guide you. Extension guidance identifies crowding, declining vigor, smaller growth and an aging center as useful signs that division may be worthwhile. citeturn0search5
Common Mistakes to Avoid
Dividing during a heat wave: hot, dry weather increases stress. Cutting the crown into tiny pieces: very small divisions may take longer to recover. Planting too deeply: keep the crown at about its previous soil level. Letting new divisions dry out: roots need reliable moisture while they establish. Creating a soggy planting hole: consistently saturated soil can encourage root and crown problems. Using dirty tools: sanitation matters, especially when moving from one hosta to another.
A Simple Fall Hosta Division Checklist
- Choose a cool period with workable soil.
- Water beforehand if the ground is dry.
- Prepare a spade, sharp clean knife, gloves and planting area.
- Dig widely enough to protect the main root ball.
- Lift the clump gently and inspect the crown.
- Separate healthy sections with several growing points and roots.
- Replant at the same depth as before.
- Water thoroughly after planting.
- Maintain even moisture while roots establish.
- Keep mulch away from the crown.
- Do not divide plants showing signs of serious disease.
Final Thoughts
Dividing hostas is less about forcing a plant to multiply and more about giving an overcrowded clump a fresh start. Dig carefully, preserve healthy crown and roots, replant at the original depth, water consistently, and avoid burying the crown beneath mulch. If your hosta is healthy and still performing well, there is no rule saying it must be divided on a fixed schedule. Divide when the plant or your garden layout gives you a good reason, and choose the season that gives the new divisions the best chance to establish.
Reliable Gardening Sources
- University of Minnesota Extension — How and when to divide perennials.
- University of Minnesota Extension — Hostas: growing, transplanting and dividing.
- Penn State Extension — Hosta diseases and sanitation practices.